
The Booking Approval feature allows you to manage guest requests for events that require approval. Follow these steps to manage booking approvals efficiently.
Enable Booking Approval
1. Activate Approval Requirements:
- Navigate to Inventory > Items > Manage Item > Booking and Payments
- Locate the Booking Request section in your settings.
- Select the checkbox for “Events booked for this experience requires approval.”

2. Enable Guest Cancellations (Optional):
- Allow guests to cancel their booking requests if needed by enabling the “Guest can cancel submitted requests” option.
Managing Booking Requests
1. Review Pending Requests:
- Access pending bookings from your Notification panel, Calendar or the Transactions page.
- Each request is marked as Pending Approval on the Calendar for easy identification.


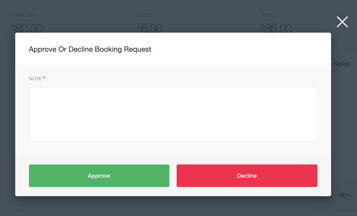
2. Approve or Decline Requests:
- Select the request and choose one of the following options:
- Approve: Confirm the booking and notify the guest via email.
- Approve with Comments: Add personalized notes for the guest upon approval.
-
- Decline: Reject the request and optionally provide a reason.

Tips for Effective Approval Management
- Use the approval options in the Transactions panel to add custom fees or extras before finalizing the booking.
- Leverage the Notes section in the booking details to document any special requests or changes.
This streamlined process ensures you can manage booking requests professionally while maintaining flexibility for your guests. For additional support, refer to the knowledge base or contact our team.